MicroPython Tutorial
Getting Started with MicroPython
- Building MicroPython for ESP32
- MicroPython: Input and Output
- Installing MicroPython for ESP8266 & ESP32
- MicroPython Libraries
- MicroPython: Motor Control
- MicroPython: Networking
- NodeMCU (ESP8266)
- MicroPython on the OHMC LoliBot
- WebREPL and WebPad
- MicroPython on the Witty Cloud
- MPY-TUT
- esptool.py
- esptool.py test cases README
- mpy-webpad
- WebREPL client for MicroPython
Installing MicroPython for ESP8266 & ESP32
1. Download Firmware
Download prebuilt firmware from micropython.org:
Or if you cloned this repo, it’s already here:
2. Install esptool
You need at least Version 2 of the esptool utility, and a USB port.
Linux
Note that the vendor package esptool is horribly out of date on Ubuntu at least,
so you’re better off installing from pypi. The vendor package is generally installed
as /usr/bin/esptool, whereas the pypi version is generally installed as
/usr/local/bin/esptool.py.
Plug the board in to a USB port, and check for a device called /dev/ttyUSB0 or
/dev/ttyACM0 or similar. If all else fails, check dmesg for USB events.
From a terminal, first add yourself to the group ‘dialout’ (or whatever group owns the device):
sudo addgroup $USER dialout
exec newgrp dialout
exec newgrp -
And then install esptool:
sudo pip install esptool
esptool.py version
Mac OSX (10.11)
From terminal::
sudo easy_install pip
sudo pip install --upgrade esptool
esptool.py version
Your device is called something like “/dev/cu.something” depending on the type of device. When you find it, set up an environment variable so we don’t have to keep typing it:
export PORT=/dev/cu.usbserial
If you can’t find any devices which look like that, you need to install third-party “VCP” (Virtual COM Port) drivers for your device. Typical locations:
Once you’ve done that, the device should appear in /dev.
Windows 10
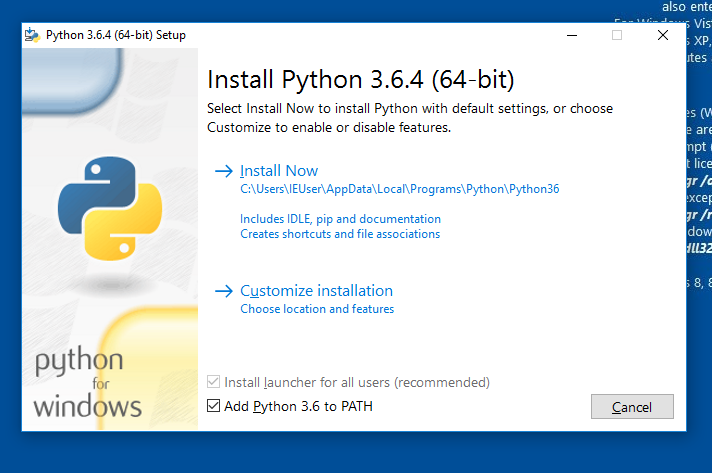
Download Python 3.6 from https://www.python.org/downloads/windows/
Run the installer, make sure “Add Python 3.6 to PATH” is selected (at the bottom) and then click Install Now.
Open a command shell (CMD.EXE, or BASH.EXE):
pip install --upgrade esptool
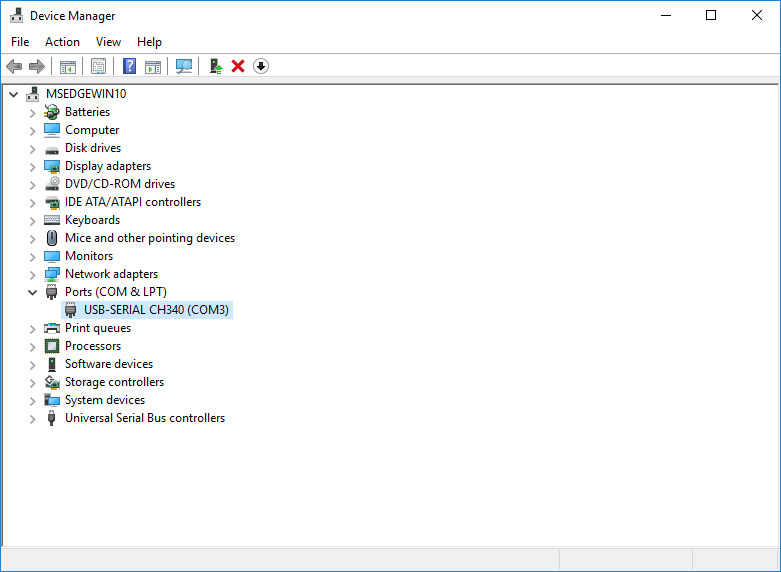
Your device is called COM3 or COM4 or something along those lines. You can find the correct COM port a number of ways.
In command line:
mode
This returns something like this:
Status for device COM15:
------------------------
Baud:            1200
Parity:          None
Data Bits:       8
Stop Bits:       1
Timeout:         OFF
XON/XOFF:        OFF
CTS handshaking: OFF
DSR handshaking: OFF
DSR sensitivity: OFF
DTR circuit:     ON
RTS circuit:     ON
Or have a look in Device Manager under “Ports (COM & LPT)” for a familiar name.
If you can’t find any devices which look like that, you need to install third-party “VCP” (Virtual COM Port) drivers for your device. Typical locations:
3. Uploading Firmware
Once you’ve identified your serial port, you need to upload the firmware image you downloaded
in step 1. In the commands below, $PORT is the port you identified in step 2.
First check that you can communicate with your device:
esptool.py --port $PORT --baud 115200 chip_id
Which should return something like:
esptool.py v2.2
Connecting....
Detected chip type... ESP8266
Chip is ESP8266EX
Uploading stub...
Stub running...
Chip ID: 0x00531b1c
Hard resetting...
For esp8266:
esptool.py --port $PORT --baud 115200 write_flash 0 bin/esp8266-20180104-v1.9.3-238-g42c4dd09.bin
For esp32 (note: the offset is different):
esptool.py --port $PORT --baud 115200 write_flash 0x1000 bin/esp32-20180104-v1.9.3-238-g42c4dd09.bin
Note the different offset used for ESP32. You can try faster baud rates if you wish (eg: 230400, 460800), the firmware will load more quickly but reliability varies.
Connecting to REPL
Linux and Mac OSX
Use ‘miniterm.py’ which is part of pyserial, and installed at the same time as esptool. Use the port name you worked out in the previous step. MicroPython standard builds use 115200 baud:
miniterm.py $PORT 115200 --raw
You can now chat to Python at the REPL.
Windows
miniterm.py is available and works at a pinch, but its terminal handling is not good.
If you have the latest linux subsystem for Windows you may be able to use the instructions
above (look for /dev/ttyS3).
If you’re configuring an ESP8266, you may be able to put up with it long enough to get WebREPL up and going (see WebREPL and WebPad)
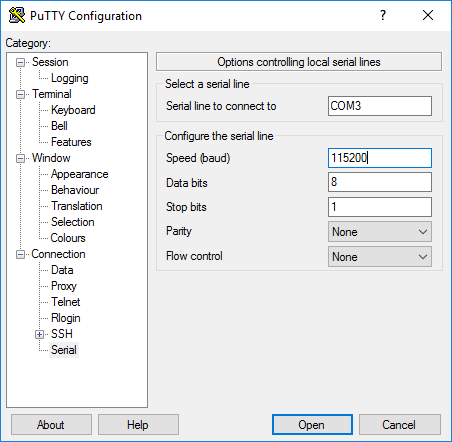
Otherwise, I’ve successfully used ‘PuTTY’ which is available from http://chiark.greenend.org.uk/~sgtatham/putty/latest.html
Run PuTTY, select ‘Connection’ ‘Serial’ and set the serial line to the previously identified COM port number (e.g. COM3), the speed to 115200 and Flow Control to None:
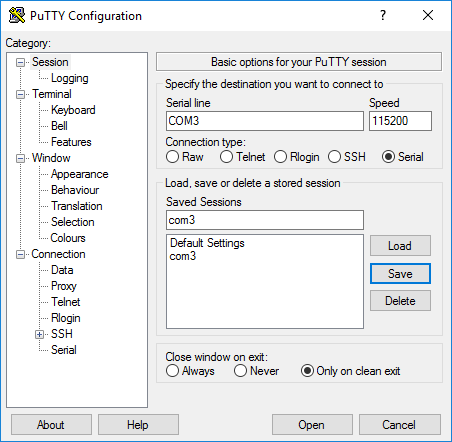
Go back up to “Session” on the lefthand menu, check “Serial” on the right, then click “Open”. You can then give your session a name ‘com3’ and click Save so you don’t have to do that all again next time. (Note that COM port numbers can change unexpectedly in Windows and you will then need to change your Putty saved settings.) Yes, the user interface leaves a lot to be desired:
Setting up WiFi
There’s plenty of other microcontrollers around: the thing which makes the ESP microcontrollers a bit special is their built-in support for WiFi networks.
Micropython exposes this via the ‘network’ library. To get your device talking on the network, do the following
import network
w = network.WLAN()
w.active(True)
w.connect('AP','Password')
w.ifconfig()
That last command returns a tuple of (IP address, netmask, gateway address, DNS address). Note down your IP address … we’ll use it later.
Note: some corporate wifi systems are not easy to connect to, if the connection doesn’t seem to be working try connecting to wifi on your phone or a small network you control.
EXERCISES
-
Load the latest MicroPython firmware onto your device.
-
Configure it onto the conference network (details TBD)
-
Check that you can ping it from your laptop. You may need to reconnect your laptop to the same SSID / Password as you used for the device.
-
Assuming you’re using an ESP8266 device, set up WebREPL as per the WebREPL and WebPad page.